
After Action Report : S4 Welcome Back - Part 2
The US setup - overview
The US player is hard put in this scenario to cover all the ground necessary to keep the Germans from reaching the German exit zone, a look on the map gives some tell tale signs of where the real problem lurks. But before we do, let's have a bit of a look at the order of battle of both sides;
The Ami's have some nice hardware going on here. Two flamethrowers , two medium machineguns, and to top it all off : a .50 cal heavy machine gun! With a range of 16 hexes, 8 firepower (FP) and a Rate Of Fire (ROF) this puppy can pound any German assault right down in the dirt! More so if its fire is directed by the awesome 10-2 leader or even the lesser 8-1. Just imagine those Krauts moving through open terrain sucking up a cumulative -4 bonus to the dice rolls for moving in open terrain and using non-assault movement with leadership of the 10-2 leader.
But there is a catch... There are only 8 squads in the whole American order of battle with 3 leaders to the German whopping 16 squads and five (!) leaders. Sure, the American squads have more firepower and better range, but the 1:2 squad ratio will keep the American player very hard pressed to present a front to so many German squads over the whole length of a gameboard 31 hexes wide. And to be prepared for the German entry of the gameboard on turn 1 that is exactly what the American player must do : cover EVERY possible avenue of approach to delay the German player long enough to win the game.
If the American is to setup with most of their units and heavy weapons on one side of the board, the Germans will happily enter the board on in turn 1 on the opposite side and rush to the exit zone unhindered. Setting up all squads in the centre is almost as bad. The two large wooded area's will shield both of the flanks from most of the fire from an American setup in the central village area , after which it is an relatively quick and easy trip to the exit zone for the German player.

The map : Germans enter on turn 1 anywhere on the top of the map and exit in the lower centre of the map., Americans setup between these zones.
So the layout of the board and the disparity in the amount of squads more or less dictates the needed setup here: several clusters of American squads which are as mutually supportive to each other as possible while still keeping a line of sight on as much of the board as possible at the same time.
The problem here is that while the German player has 5 leaders and can thus more or less make as many small "battlegroups" with inherent leadership as he likes, while the American player has only 3 leaders.
US setup - Centre (village) defence
To put squads far away from leadership on such an open map as this is a real quick way to lose them, so there will be no more than 3 pockets of American resistance : one each with its own leader so that should some any squads get broken (and American squads with a low morale of 6 always do) they will be able to rally quickly and get back into the game before their buddies get overrun.
So 3 places on the map to make a stand then, now where to do this? Note that the lower 4 hexrows on the map are illegal setup areas for the Americans by scenario rules, so there is no using that nice big stone building in the middle of the German exit zone only 2 hexes away from the board edge as a machine gun (MG) nest. I considered putting most or all MG's in the centre village where they sooner or later are sure to get some shots at the Germans exiting the map but decided against this because the American job is to delay the Germans 6 turns and not to play a chance game that enough Germans will get shot in the end while running for the exit.
So, I place the best with the best in the centre of the board. The .50 cal and a 6-6-7 squad guided by the awesome leadership of the 10-2 leader go in the centre group in the village. From here they can fall back mid-game to guard the exit zone should need arise. Note that the 6-6-7 operating the .50 cal is one of the few Ami squads with 7 morale and a good range of 6 hexes. This is to make sure the best weapon in the American order of battle will stay up and running as long as possible while still being able to bring down 14 FP on the enemy at 6 hexes range. This way any German entering on the centre 1/3 of the map will get a 12 FP attack (there is no 14 FP column) if he moves on map in turn 1 and hopefully some further 8 FP (ROF) attacks from the .50 cal for every movement point spent thereafter, if he is stupid enough to keep on going that is.
To make sure the .50 is not overrun by a massive horde of Germans once they run out of fire opportunities or ROF, I put an additional 2nd line 5-4-6 squad next to it for protection A further 7-4-7 unit goes in another stone building hauling a flamethrower with a good view of some of the woods to keep the Krauts from moving on board through all those trees beside the village.
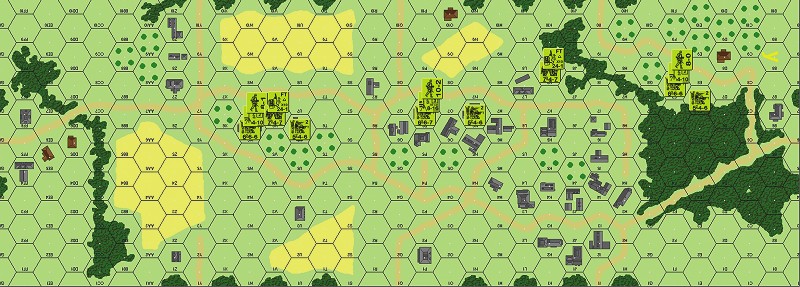
The US setup : three clusters of squads left, right and centre each with a leader, poised to delay the Germans as long as possible
US setup - Right flank defence
The right flank is an unhealthy place to hang around... The G3-G7-K9 tree line makes it impossible for the units in the centre of the map to see what is going in the mammoth forest behind it once the game gets going. No line of sight, no support! So any guys stationed there will have to fend for themselves. A very uncomfortable idea.
I fear that US units out of sight behind all those woods will invoke a massive influx of German squads there after his setup (8 squads or so?) to overrun the few isolated defenders, cut them up while isolated from the other US squads, followed by a quick German rush over the wood-road C7-C5-G3 where they exit the woods again at the lower-left end, unnoticed, unharmed and only 3 hexes away from the exit zone!
To make this prospect worse; any defenders on the left flank (and maybe even some in the centre) are in fact so far away that such a rapid move by the German player could be completed before those defenders are rerouted and able to bolster the defences on the right flank. Furthermore, the rightmost part of the German entry zone is littered with orchard hinderances, making it hard to stop those Volksgrenadiers before they reach the safe woods/wood-road route.
Still, it has to be defended in some way or another. There is simply no alternative. I'll put a 6-6-6, a 5-4-6 and a medium machine gun (MMG) there with the worst leader of the lot: an 8-0. This makes the smallest of the three groups, this is done on purpose because I don't like running the risk of getting more valuable units isolated and smashed there. Another problem is the sheer lack of decent cover to hide in; there are only three buildings in the upper-right corner of the map. One has poor visibility and is very far away from any other US units (B6) , one is a death-trap for any broken units because there are no safe rout paths from it (D8) , leaving only the wooden building in F7. I won't even put al units in the building, afraid that one low die roll will break them all at once and collapse the whole defence there in one go.
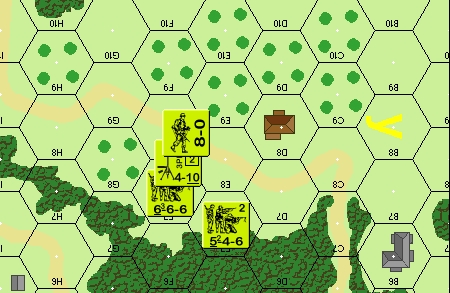
Close-up of the minimal defences in the right-upper corner - the American' weakest point
US setup - Left flank defence
The left flank faces a similar problem as the right flank does. There are woods there that obstruct view to all those behind it, this makes it a very safe route for any Germans once they manage to get behind the CC1-CC6-FF7 tree line. Again, any American units that get isolated there are vulnerable to German efforts to use local numeric superiourity to overwhelm them.
There are three spots on the left flank that could be used to control this part of the battlefield... ;
1 - The DD5-EE5-FF4-FF6 building cluster on the far left
2 - The Z7-Z8-Z9 row of stone buildings top left
3 - The U6-V6-W6 buildings left centre
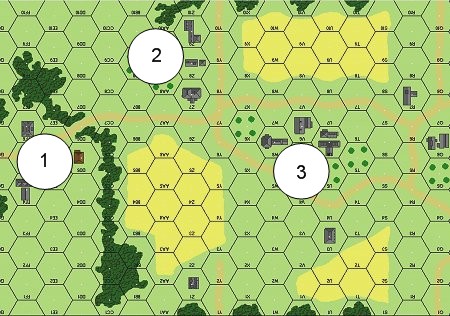
The left flank (only left part of map shown) - three possible sites to concentrate the defence. Which one is best?
... And neither is really any good.
Spot #1's buildings are very far to the left of the map - away from any ad-hoc reinforcements or support, with no line of sight (LOS) at all at the German exit zone. It does however deny the Germans the easy route to the exit zone moving behind all those woods, where they are safe from fire from .50 cal MG in the center of the map.
Setting up in the woods (CC6) is an option by itself, there is a great rout paths through all those connected woods, but the cover is really miserable with only a +1 Terrain Effect Modifier (TEM).
Spot #2 is looks really nice with its stone buildings and fantastic command of the surrounding fields, but is very close to the German turn 1 entry zone who just might assault-move under cover into the woods right above these buildings and then advance into close combat as soon as turn 1! This is a daunting prospect because even if the Germans succeed in locking only two American Squads in melee, that would mean a loss of 25% of manpower for the time being. The risk of getting surrounded and forced into surrender by failure to rout is also quite high so close to the entry area, though a flamethrower in the upper of these three buildings might dissuade the German player to come too close...
Spot #3 looks best but is a bit of a compromise. The Germans won't be able to get to the US units here without crossing open fields, and most of their fire on these buildings will be long range (half firepower!) as the Volksgrenadiers have only 4 hexes normal range. The site also has a commanding view of the upperleft piece of the map, important as this is the path I presume a lot of Germans will take in an attempt to get behind those woods. Also , a great LOS to the German exit zone, and that will help us a lot in the end game. Also a bonus is that the units in the center (the .50 cal MG and 10-2 leader!) can cover this position.
Downside here; horrible rout paths... if these units even get broken and are pushed out in the open in the Rout Phase (for not being allowed to stay adjacent to any visiting German squads for example) they will be interdicted all the way back to the Normandy beaches! Also bad is the abandonment of the Z7-Z8-Z9 line of stone buildings. The German player will seize these as fast as possible I'm afraid, and turn them into nasty fire bases to pour fire into the US ranks. This might call for the infamous 'skulking' tactic of avoiding fire as much as possible by assault-moving out of LOS in the Movement Phase and advancing back again in the Advance Fase. This avoids being fired upon in the enemies Defensive Fire phase and could work quite well here.
So spot #3 is the winner today. I'll deploy a squad with good range here (a 6-6-6) with a MMG and a 8-1 leader to reap those surrounding fields (8 FP up to six hexes, and 6 FP up to 12 hexes away). For extra protection and as reserve machine MMG-operator an 5-4-6 squad is added and an 7-4-7 with a flamethrower is added to discourage the German to rush the defences.
This completes US setup as in the pictures above. Doesn't look like much, but it will have to do. On to the German setup!
-> Go to Part III of this AAR

|