
After Action Report : S4 Welcome Back - Part 3
The German setup - overview
The German player has a comfortable advantage in numbers in this scenario, so losing a few here and there because of a bad setup isn't really a showstopper for the Krauts, at least not right away. This makes the German side in this scenario an excellent choice for least experienced player of the two in this game, moreover because all the Germans move onto the board in game turn 1, and do not have an onboard setup like the Americans that can be messed up before the game has even begun.
Still, some thought has to go to where the main German effort will be made by the German player.. In the centre perhaps, or on the left or right flank, a combination of these these? And if so, is it wise to go take just a few squads to attack one flank while making a massive 'Schwerpunkt' attack on the other?
Some answers lie for the taking off course. The American player is always first with his setup so the majority of German strategy will be based upon what the US player has setup before him. In our game, with my particular US setup it might be wise for Jeroen's Germans to hit the flanks really hard and avoid the deadly .50 cal with 10-2 leader deathtrap in the centre alltogether. After all; the .50cal & 10-2 leader combo can only support either the American left flank OR the American right flank in an emergancy, but not never both at the same time. Overall this is the German possibility I fear most, more so if his main effort will be concentrated against the weakly defended American right flank, where it is very hard to spot the Germans behind the large wooded area.
Before you look at the picture of the actual German setup below, it should be noted that we use a 'house rule' in ASLSK games. It's actually a rule taken from the full ASL game that states that a player who does not setup onboard (but instead moves onboard in turn one) must, before play begins, setup his units offboard next to the location where they will enter in the first movement phase, in a "virtual" hex so to speak. Meanwhile, he still has to observe the 3 squad-per-hex stacking limits.
So why this rule? It's really a way to make sure that the attacking player does not enter 1/3 off his force, then looks at how many units survive, and then decides to act upon this newly gained information to decide wheather he will enter with the rest of his force at the same spot, or instead will enter somewhere else on the battlefield entirely. It is more realistic too, in reality it is almost impossible for a battlefield commander change his original attack plan once the troops "go over the top". Once commited, everybody will more or less have to 'sit out the ride' and hope the plan off attack is as good 'for real' as it looked on the maps of the battalion commander!
Note: After writing this AAR, Starter Kit 2 was released and setting up units in this manner before play became an 'official' rule in ASL Start Kit play.
So.. let's take a look at how Jeroen's Volksgrenadiers plan to assault the US line ;
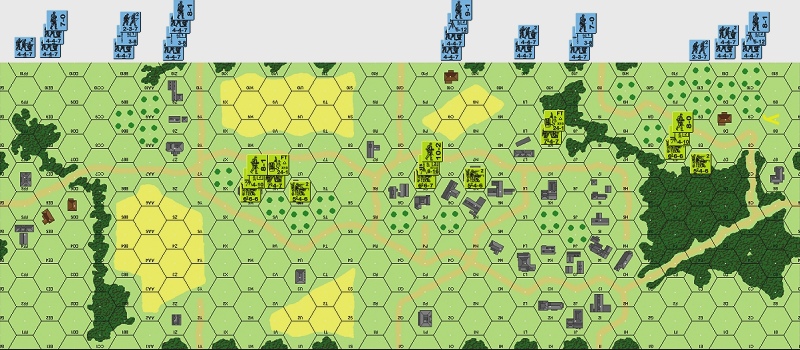
US & German setup. The German units will enter in the hex they are positioned next to.
A surprise... Jeroen has opted to attack more or less everywhere, positioning forces more or less opposite to mine and trying to mirror the number of attackers to the number of defenders. The left flank will be attacked by the largest force of Germans, the right flank by a smaller force and the centre seems to get just enough units alloted to pin my .50 cal and 10-2 leader. At least, that is what seems to be their purpose over there.
In my personal opinion his German centre group has found itself a good way to get killed really fast. There is only one small wooden building in the middle of the map for the all those 4-4-7 squads, German 9-1 leader and Medium Machine Gun (MMG) to hide in, and the routing possibility's are quite bad should they ever get broken.
I suspect my 10-2 leader with the 6-6-7 squad and .50 cal MG have a more than decent chance to destroy this small German force pitted against them in 1 or 2 turns, after which they can head off to support either the left or right flank.
My right flank might be in trouble if I don't bag some Germans when they enter the board. Note that the orchards here give them some pretty decent cover (+1 per orchard hex between target and firer). Also note that the orchards void the -1 FFMO (First Fire Moving in Open) bonus. Even if a unit has no orchards hexes between the firer and target but the target is still in an orchard hex the -1 FFMO bonus for the attacker is lost. This makes sense when you think about it, as the target is not moving in open ground but through the trees of the orchard.
On the left flank I'm more or less outnumbered 2:1 and as suspected the Germans seem to be gearing up to move to the abandoned row of stone buildings (Z7-Z8-Z9) with a -1 leader, a bunch of squads and some LMG's (Light Machine Guns), probably to make sure they will get some 16 or 20FP shots from good cover. This prospect doesn't seem terribly appealing to my low-morale US troops, but as long as those German boys are shooting the're not moving toward the exit location.
'Ere they come - Turn 1 (German)
Time to get started. Jeroen gives the word to his cardboard NCO's and the Germans start to roll toward the American line.
We have no 'rally phase' off course so it's straight to the 'movement phase' where Jeroen's three-pronged attack takes form.
On the left a brave band of Germans runs toward the leftmost forest but Jeroen fails to see the LOS (line-of-sight) the American 6-6-6 squad+MMG has on this open patch of ground and the squads take a beating, breaking two. Unfortunatly the machine guns gets no ROF (rate-of-fire) so it's done for this turn. Though luck for my Americans, as there are plenty more Germans inbound like the ones who take the (Z7-Z8-Z9) stone buildings in a textbook manouver without much further American interference.
The German centre group assault moves onboard and to my utter astonishment the .50 cal machine gun with squad and 10-2 über-leader hit absolutly nothing. What are those guys doing over there?
Bad luck seems to be in the air for the Americans today as the Germans make decent progress on the right flank as well, through the orchards and even reach a stone bulding unmolested, seemingly impervious to all MMG and small arms fire!
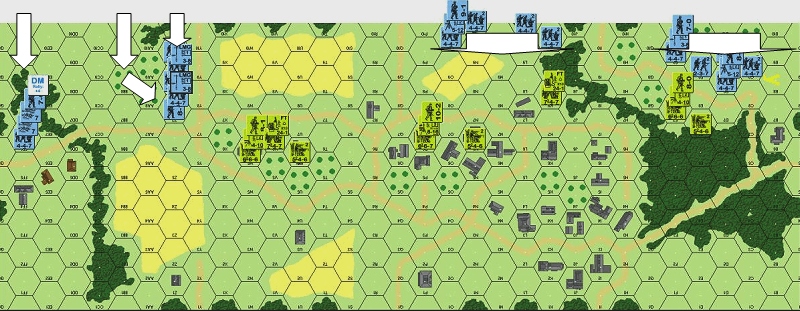
End of German turn 1 - The Germans move onboard
Now I can't stress enough how horrible this (half) turn has been for the Americans. The American survival in this scenario depends entirely on stopping (a lot of) Germans from the outset, when they are most vulnerable - when entering the board without cover. The end result here is two broken German squads, and those even rout toward the wrong way - the exit zone! The American machineguns have hit almost nothing and all of them failed to keep ROF. If this keeps up the Germans will be all over me in one more turn and on their way to Paris in turn three!
Turn 1 (American)
My turn now. I have nothing to rally in the 'Rally phase', while the two Germans squads on the left try to get back in good order but fail to do so.
Now normally I'd consider moving the American troops one hex back everywhere (with an 'assault move') in the 'Movement phase' and then sit out the German 'Defensive fire phase' out of sight where they can't see me, then advance the American units back into the line in my 'Advance phase'.
This tactic is called 'skulking' and is almost always used on the defence. Downside of it is that if I decide do so and actually move, I can't shoot in the preceding 'Prepared fire' fase.
I decide against this tactic now, because assault moving a hex to the rear doesn't do me any good on the right flank (I'll end up in a +1 cover wood hex in plain sight) and if I don't break some of these Germans right away with some 'Prep fire' there won't be anything left to fire with at all pretty soon.
So on the right flank I fire everything I've got , and hit nothing (again). The return fire in the German 'Defensive fire phase' does hit its mark however any my units break and run like madman to the rear in the 'Rout phase', leaving just one 2nd line squad to face the five-squad German onslaught. Deciding the better part of valor is discretion I pull back the last 5-4-6 squad one hex in the 'Advance fase'.
In the centre the .50 cal machine gun starts to warm up and breaks the leader/MMG stack. I also try to go in for the kill and assault move the flamethrower forward. It gets fired upon but seems to be okay at first, until we remember that squads who carry big tanks of highly explosive napalm get an additional +1 on the attack rolls against them. Adding this modifier, the squad has to make a morale check, gacks it, and had to retreat in its broken state in the 'Rout phase'.
On the left flank things aren't much better. I hit nothing but return fire from the stone buildings break my MMG squad. I decide to rotate it to the rear and swap it for the unbroken squads in the rout- and advance phase. Please note my huge error here. As you can see on the illustration below, I move the unbroken squads forward, but also the leader.
Yes. I know. Please repeat after me : "you are an idiot".
Never EVER leave your broken units to rot and die, always team them with a leader if you have one available so they can rally and get back into the fight later. I was VERY sloppy here to advance my leader forward to where it can only get broken or die and thereby doom the whole group of squads.
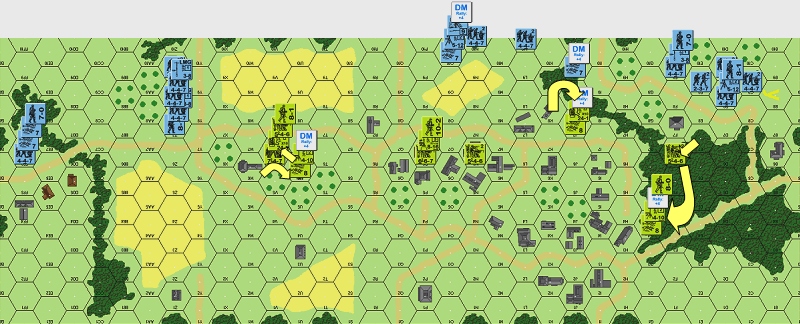
End of German & American turn 1
Looking back on the whole of turn 1 I can safely say that this is a disaster in the making. I don't want to whine about dice, but with no ROF at all with two MMG and a .50 I think I got the short end of the stick here. I'll just have to remind myself that (bad) luck always tends to 'even out' over time.
Unfortunatly the Americans now have more squads out of action then the Germans who had to assault the map over mostly open terrain! The right flank is in shambles, with only one squad left to stem the tide there, I'll have to pull back and hope to keep the Germans occupied long enough some way to rally my other units(s) there.
However, all is not lost. If I pull back a bit to shorten the line and manage to rally some squads (not too unlikely - American squads have a 'broken-side' morale of 8) then I could perhaps maybe with some luck hold on by my fingertips...
> Go to Part IV of this AAR

|